Scanning is the basic modus operandi of all antivirus security suites out there! That is why we always prefer antivirus products with stronger scanning algorithms. Bitdefender is, as you know, having such a strong algorithm when we do consider the case of performing scans in your device. In one of our previous articles, we did tell you how you to scan files or folders using Bitdefender 2016.

There, we had talked also about special scans that can be used for certain files / folders. In addition to that, however, Bitdefender has a feature named Scheduled Scans. In this article, we’ll have a detailed tutorial on how to schedule file/folder scan using Bitdefender 2016. We will also tell you briefer details on the concept and uses of Scheduled Scanning in Bitdefender Products.
An Introduction to Scheduled Scanning in Bitdefender
Of course, you know about scanning! It’s done through the thorough inspection of each file — or every file if you scan an entire folder. Nevertheless, you may not always have enough time to perform scans on your confidential folders. That having said, if you have some ultra-confidential information in those folders, you need to scan them regularly. If you don’t, chances are that you’ll have to compromise data integrity. So, scheduled scans are introduced as a viable alternative to this. Instead of relying upon fully-fledged system scans, scheduled scans allow you to perform scans to certain folders or files, at a scheduled time.
Extra Readings:
- How to Use Bitdefender 2016 Ransomware Protection Effectively
- How to Improve Startup Time Using Bitdefender Startup Optimizer
For instance, you may have an official folder in your computer! You may be adding data from different sources. In an instance like this, you need to make sure that there is no virus in the particular folder. And, you’ll have to do this in a regular basis. Of course, you cannot spend your valuable time for running a system scan all the time. However, using the Scheduled Scans feature, you can schedule Bitdefender Security Suite to perform a scan at given intervals. You’d be able to set the scan weekly, twice a week, twice a month or once a month.
How to Schedule a Scan with Bitdefender 2016
Now that you know how it works, we’ll go to the tutorial. We repeat the fact that Scheduled Scans are usually made for running scans on particular files or folders. Technically speaking, it’s a custom scan that has been set to repeat on periodic intervals. You can follow the steps given below to Schedule file/folder scan using Bitdefender 2016.
Step 1:
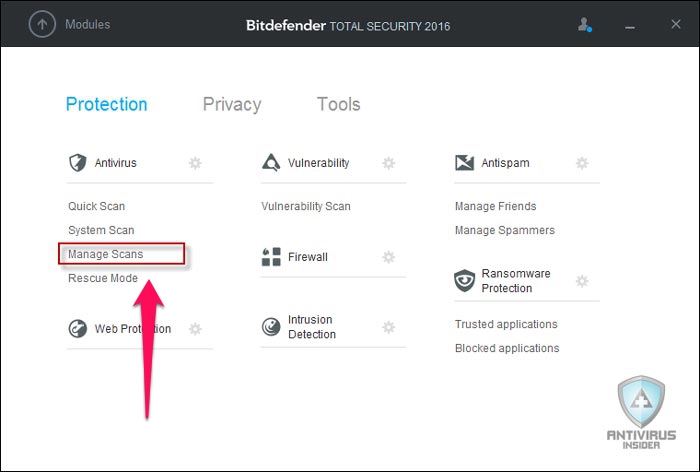
We are using Bitdefender Total Security for this case. However, the feature is available in most of the protection suites from Bitdefender. First, you need to open the dashboard of your Bitdefender Security Suite. Select Modules from the available options. From the multi-tabbed interface, choose ‘Protection’ panel.

On the top-left section of dashboard, there’s a tab named Antivirus. Under the tab, you can see one ‘Manage Scans’ option. It’s actually the Scanning module of your antivirus suite. Now, click on that link.
Step 2:
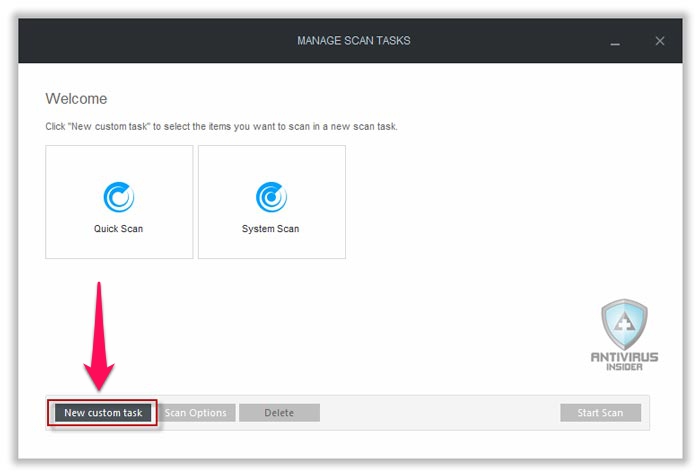
In the upcoming window, you can see the available options of scanning. Unless you have added a custom scan prior to this, you will see two options — Quick Scan and System Scan. However, we are now going to create a custom scan that has been programmed to repeat.

To do that, you need to click on ‘New Custom Task’ from the bottom-left portion of the interface.
Step 3:
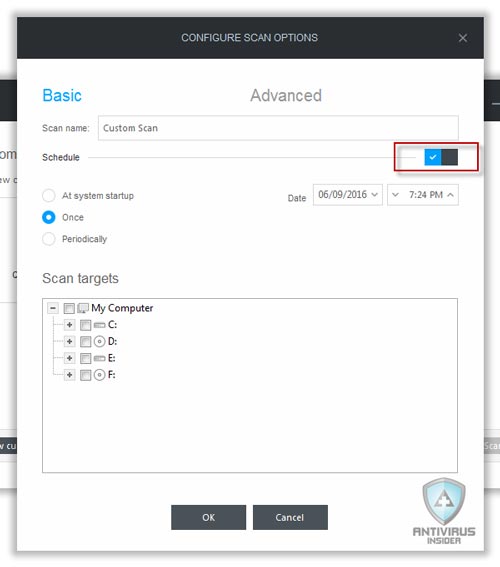
In the upcoming pop-up window, you can decide various things about the custom scan and its iteration. Details to be provided are as follows.

- You need to give the Scan a Name. For example, you can call it Custom Scan.
- You need to select whether you want to Schedule the scan. So, tick the Schedule option.
- You need to select the time of the scans. Here are actually three options — at system Startup, Once and the Periodical option. If you want to perform just once, you need to provide the scheduled time. If you need the scan to repeat, you need to select the iteration interval too.
- You also have to select the Scan Targets. Here, as you are planning to scan a particular file/folder, you need to browse and choose the file.
If you have provided all these details, you can click on ‘OK’
Final Step
If everything went well, you can see a new Scan profile in the ‘Manage Scans’ window. It would be shown along with Quick Scan and System Scan. So, it means you have successfully scheduled file/folder scan in Bitdefender 2016.

Summing Up
So, now you know how to schedule file/folder scans using Bitdefender 2016. It’s truly a time-saver feature, especially when you want no compromise in safety. You can use this method to conduct fully-fledged scans as well as specified scans. Feel free to check our discount coupons for Bitdefender products.