We always recommend paid antivirus suites to our readers, instead of those free or trial ones. Of course, they have seen lots of improvement in the security aspect, at least in the long run. Then, there are people who are hesitant to spend money on digital products and end up in various threats. Some threats are so damaging that you cannot even boot up your PC in a normal way. Ransomware and Screen-Blocking malware are an example for this category. However, don’t worry if you’d fallen into one of such pits – there’s a way to escape.

Kaspersky Rescue Disk is one of the effective methods to regain access to your computer, by removing malware infections. It works in a different manner when compared to standard antivirus suites. In this article, we will tell you more about this Kaspersky Rescue Disk recovery and a suggest a fully-fledged method to clean your infected PC using this Rescue Disk.
Kaspersky Rescue Disk – What’s It and How It Works?
You can relate to this process if you have tried installing an Operating System – probably, Ubuntu Linux – from removable drives. Antivirus Rescue Disks work in the same manner. You can boot these discs just as you are booting another OS from pen drive or CD drive. So, instead of loading the existing Windows OS, you will be able to load the specific antivirus suite for malware removal. Once you are done with this initial setup, a Rescue Disk will start its work. Kaspersky Rescue Disk is one of the popular methods for this purpose. Primarily, it’s because Kaspersky is a trusted antivirus. Second, it has been used by thousands of people to get their PC back. Now, we will take a look at its working process.

Kaspersky Rescue Disk is a completely free tool for cleaning your malware-infected computer. There are times when one malware can make changes to system files and stop you from accessing Windows OS. This trend is seen in most types of ransomware and some adware. In that instance, what you see while booting up the PC will be a simple ‘blocked’ message. Most people try to format their computer at this point, but it isn’t necessary. Antivirus Rescue Disks are made to fight off this problem — by introducing a boot-level client for cleaning the PC and removing malware.
You can simply burn one of the effective rescue disks into a removable drive and boot your computer with the drive. While booting up, you will see an interface that has in-depth control over your PC. Using this interface, you can scan or swipe a hard disk partition and remove the viruses. In case if you do not know about the particular infected drive, you can do full-device scans for better security. These disks come with Internet support. So, there is no problem in updating to the latest virus definitions and removing even the toughest ones in street.
Now that you have an idea about the working process and advantages of Kaspersky Rescue Disk, we’ll move onto tutorial.
How to Clean Your PC using Bitdefender Rescue Disk?
There are two major steps involved, but we will go in-detail.
Step #1 — Download Kaspersky Rescue Disk
First of all, you have to download Kaspersky Rescue Disk, from the official sources. You need to download the latest and updated version, due to some reasons. First, it will have a better scanning process; second, it will also have some updated virus definitions. The download size is 286MB. It should be downloaded in a few minutes or so.
Step #2 — Burn the Files into Disc
Now, you have to burn all the information to a Compact Disc or a DVD. In fact, you are downloading an .ISO file and you’d need a third-party solution to burn files to discs. Alternatively, you can try some solutions to burn the same to a USB Drive. Of course, depending on the OS version, you can choose the convenient burning software.
Step #3 — Boot the Disc
You can insert your Kaspersky Rescue Disk into the computer and reboot your device. While booting up, you will see one message like shown below. It says, press any key to enter the menu. You will have 10 seconds to press any key. If you do not press any key, system will boot Windows normally.
Step #4 — Choose the Mode
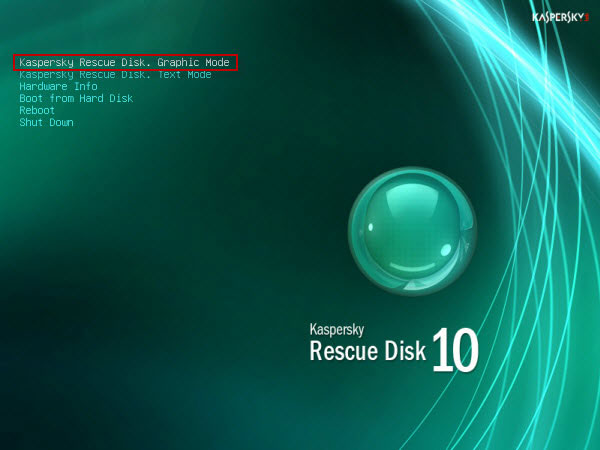
Now, from the upcoming menu, you have to choose the corresponding option. You can either choose the Graphics Option or the Text Mode.

You also have options for Reboot, Hardware Info and Shut Down in the same menu. The best choice is Graphics mode. Press enter to move on.
Step #5 — Accept the Agreement
You have to press ‘a’ [Lowercase] to accept the agreement. You may read the whole agreement if you like.
Step #6 — Launch the Dashboard
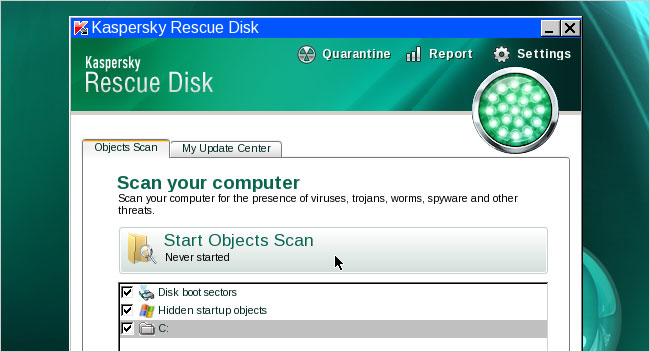
Now, you would be in the main interface of Kaspersky Rescue Disk. It’s more or less like any other Windows program.
Step #7 — Update Virus Database
To update the virus database, you have to go to ‘My Update Centre’. From the interface, select the ‘Start Update’ button and it will download latest definitions for you. Of course, you need an active internet connection at this point.
Step #8 — Start Scanning
You can now go back to the ‘Objects Scan’ tab and hit the button to ‘Start Objects Scan’. Depending on size of data and the type of malware, the scanning may take a few minutes. You should have the patience to wait until the process is fully done.

After the scans are completed, you will be able to see the presence of viruses, if any. Now, just as you with other antivirus programs, you can Quarantine the files. By the way, Kaspersky Rescue Disk offers a bunch of additional features like a File Manager, Terminal, Screenshot, Network Setup and Web Browser. You also have basic system controls here.
Summing Up
So, this is how you can download Kaspersky Rescue Disk and clean your computer for viruses. In our experience and those of others, Kaspersky can deal with almost all types of malware. We also found the process to be ultra-simple than most of the other Antivirus Rescue Disks. What do you think about this?