Bitdefender is one of the best Security Suites in the industry that make the best use of Web-based technology. As you do know, Bitdefender products come with in-built support for cloud-based scanning and updates. Given that you have a good internet connection, Bitdefender Security 2016 can be an optimal solution for your security needs. In most of the cases, it does not require much of configuration either. You can simply connect the device to the Internet and Bitdefender servers will take care of everything else in no time. Nevertheless, there are times when you have your own network preferences. For instance, you may need to use a Proxy Connection without actually connecting to the Internet directly.

Proxy Server Connections are used for many purposes, mainly for your identity protection. So, we don’t want to know the reasons why you are using a proxy connection in your system. In this article, we will tell you how to configure Bitdefender 2016 to use a Proxy Connection. The process is quite simple to accomplish and won’t consume much time from your side. So, shall we start the step-by-step tutorial for Proxy connection set-up in Bitdefender 2016? It needs to be noted that we are using Bitdefender Total Security here. However, the process should be the same in other packages as well.
Step 1:
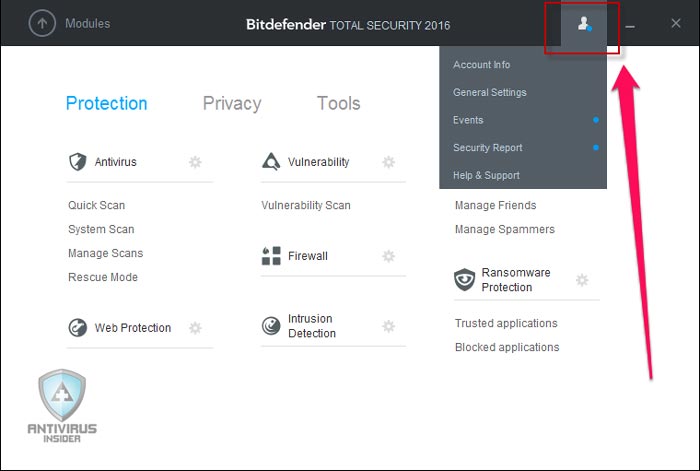
Open the main interface of Bitdefender Total Security. Just next to the minimize button, you can see an icon of one account. Click on that icon.

Now, you can see a drop-down menu with a bunch of options. From the list, you need to select ‘General Settings’.
Step 2:
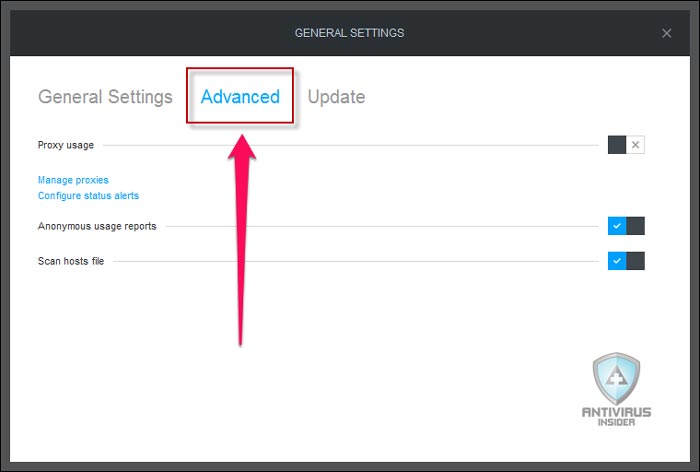
Now, you should be in the General Settings section of your Bitdefender 2016. As you can see, it’s a three-tabbed design. You have to select the tab named ‘Advanced’ to move on.

In this tab, you can see a bunch of options. First of all, you need to enable the option to use Proxies. Once you have ticked the option, you have to go to the ‘Manage Proxies’ link given below.
Soon enough, you will be lead to another pop-up window of Bitdefender.
Step 3:
In this final step, you need to input the proxy server settings to move forward. And, you have two options to use.
In First option, you can import the proxy settings from your web browser. This is possible if you are using the same proxy server in your web browser as well. That is, if you want to have the same proxy server for all the internet connections, you should select the first option.

Alternatively, you may have to use a custom proxy server for connecting to Bitdefender. You know, this can be useful at a bunch of times. In that case, you need to select the second option. As you can see in the screenshot, you can input details of your proxy server — address, port, username and password — to the corresponding fields.
Once you are done, you can hit the ‘OK’ button. All the settings should be saved by this time. So, you have successfully configured Bitdefender 2016 to use a particular proxy server.
Concluding
So, you have seen the step-by-step guide to use a proxy server. It may not be useful for almost all the common users. That having said, at particular instances, use of a proxy server becomes more or less a necessity. At those times, you can make use of this guide — and you can thank us later. Are you using your Bitdefender 2016 with proxy server? Hope you have an awesome protection experience with it too.