As a computer user, we are always scared of adware, especially when browsing the internet. I have seen a lot of PCs in my college and internet cafes which contain heavy malware that they don’t even allow us to carry out the tasks we wish.

Oops! Don’t you know what an adware is? Adware is a program that gets injected into our PC to display ads (most of the time provocative) perennially.
Do you think an expensive security tool is needed to get you an armor that protects you from adware? No, you can keep them away using Windows’ default antivirus, Windows Defender.
How to Block Adware using Windows Defender?
Blocking adware using Windows Defender is not a Herculean task. You can get it done in a few steps.
We are going to make use of PUA protection in Windows Defender. By default, you can’t get this option. Windows currently provide this additional feature on Windows defender coming with Enterprise editions only.
But here, we will be doing a minor registry modification to get this feature on every Windows editions.
Follow the steps given below to activate PUA (Potentially Unwanted Applications) protection.

Step 1: Click start and look for Windows Defender. You can also launch the app from system tray itself. If you are using another antivirus, you will get a notice saying ‘This app has been turned off and isn’t monitoring your computer.’
If that’s the case, you have to uninstall already installed app for making use of this feature on Windows Defender.
Step 2: After activation, launch the program using the way I have mentioned in the above step. Make sure that it functions as usual.
Step 3: Now, we are moving on to the core of this post. As I have mentioned earlier, you should make a minor registry edit to activate PUA protection.
You can launch registry editor in two ways. One- click the start button and search for Regedit. Two- type Win key+ R simultaneously, enter regedit.exe and hit enter.
Step 4: A UAC (User Account Control) prompt may appear. Click yes to proceed further.
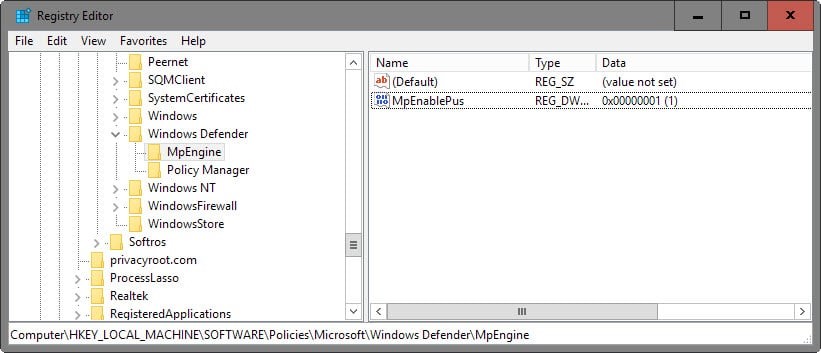
You can see some folder like icons in the right pane. From there navigate to HKEY_LOCAL_MACHINE\Software\Policies\Microsoft\Windows Defender.
Step 5: Right- click on Windows Defender and select Newà Key. Name the file as MpEngine. Now, our job is to produce value for that new file we just created.
Step 6: Right click on MpEngine (on the main left pane) and choose Newà Dword (32 bit) value.
Here also, we need to name this item. Name it as MpEnablePlus.
Step 7: Double click on MpEnablePlus to get a new dialogue box asking you to enter a value for that Dword.
Enter the value as 1 and then click Ok.

Step 8: Now, restart your PC. That’s all. You just integrated PUA protection functionality to Windows Defender without spending even a single penny.

Windows Defender blocks adware on the installation itself. If your computer already contains any adware, the tool can stop the same from running further.
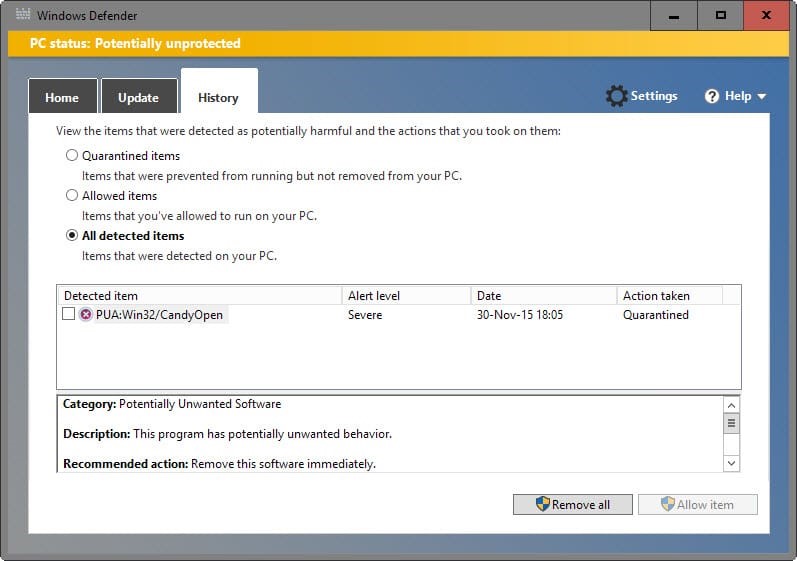
All the blocked programs can be found in History tab of the antivirus. The malicious programs will not be removed completely so that you can run them if you want.
In case, you don’t want this feature, you can revert your system back to the original state by changing the value of that dword (MpEnablePlus) to 0. You can permanently disable this feature if you delete that dword.
Wrapping Up
I think you understood the complete process. As I already said, it’s no brainier even though registry editor is included in the process. You can install any paid antivirus such as Bitdefender, Norton or Kaspersky and avoid all kinds of virus, Malware and Adware.
Hi,
Thanks for sharing such an illustrative post on blocking adware. Steps described in your post are quite valuable for people like me who often come across adware issues.
Glad to know that, you liked it Mat.