Sometimes we can’t access the operating system of our computer. It is an awkward situation when we don’t even get a chance to have a look at the happenings.

On such serious occasions, we can’t assess the problem and find a solution, from the user interface of your OS. The only thing that can be done is using a rescue drive. And, you need to create the same before the problem occurs.
So, here I am going to show how you can create a bootable Bitdefender Rescue USB Drive.
How to Create Bootable Bitdefender USB Rescue Drive
You can set Bitdefender rescue drive in three ways, either by a CD or by a thumb drive or make use of a remote location. The best and convenient method is to use a thumb drive as it is commonly available and easy to use as well.
A rescue drive checks your system for malware issues without logging into your OS interface. Instead, the drive/ disk acts as a separate OS through which you can access all the files and settings on your computer. So, you will get the problem report, and hopefully, it can also be resolved.
If you can’t find any issues and still the problem remains, you can restore all the data like a walk in the park.
The pen drive should be at least 1 GB in size. Make sure that it is empty and formatted with the FAT32 file system.
Read the following steps to carry out the process.
Step 1: Download Stickifier to inject all the required files on the USB drive to make a bootable rescue USB drive. (This link fetches you the software directly. No installation needed.)
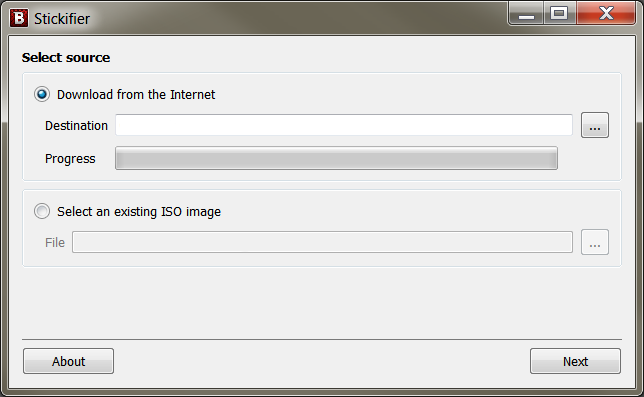
Step 2: Open Stickifier. Most probably, you will get a UAC prompt. Choose Yes and you are good to go.
Step 3: You will get two options. The first one does not require any external ISO file. The tool itself downloads the image as soon as you choose a destination folder.
Step 4: If you have downloaded ISO file from Bitdefender website, you can choose the second option that says Select an existing ISO image. Browse the file and click Next.

Step 5: You get a screen with some prerequisites. Make sure that your flash drive meets them. And then, plug it into the USB port.
Don’t forget to choose the drive letter from the drop-down window on the same screen.

That’s all. The creation process will be finished in a while.
I hope you know how to use a bootable USB drive. Just reboot the system and change your primary boot device into USB (You can directly choose boot device by pressing F8 or F12 according to different manufacturers.)
Follow on-screen instructions accordingly. Finally, you can get relief.
Bottom Line
So, the next time something happens to the OS of your PC, don’t panic. Instead, use your already created USB drive to rescue. Everything will become fine soon.
I hope you got something to bag here.
thank you for this, awesome post and information
THIS IS NO MORE AVAILABLE FROM BITDEFENDER WEBSITE WHERE I CAN FIND STICKIFIER?
thank you for this,